Building a shed may seem like a daunting task to a DIY novice. Provide a level, sound, sturdy base and the rest should be simple. Building the base for a garden building is an easy task for a single person to complete. However we recommend an extra person is on site during the construction of the shed to help with lifting and placing roof and wall panels.
Planning permission is normally not required for a prefabricated garden building, however, if you live in a conservation area or the building could intrude on a neighbours garden, you may wish to check with neighbours or local council prior to construction.
Consider the optimum site for the your garden building in terms of:
It is crucial to provide a level and dry foundation. It is unfeasible to assemble a shed on an unsound base, otherwise screw holes connecting the wall panels will not line up. For larger buildings especially where the shed is to be used as a workshop a full concrete base is best. However, generally there are two types of base suitable for a garden building, consider either:
Tools Required:
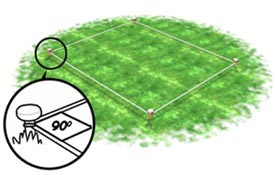
Decide where to position the shed in an optimal space, allow enough distance from hedges or fences for easy access to all sides. Using pegs and string to mark out the base 2 inch (5 cm) larger than the area of the building on each side. Finally, measure diagonals to ensure the area is square.
 Step 2:
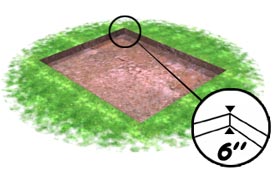
A concrete base requires 3 inch (7.5 cm) of compacted hardcore underneath the 3 inch (7.5 cm) concrete layer. The base can be level with the ground or raised above it. If it is to be level excavate the top earth to 6 inch (15 cm) to allow for the hardcore layer and 3 inch (7.5 cm) thickness of concrete.
Level the area with a rake and spade and remove the pegs.
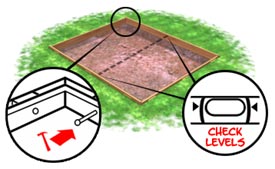
Set up levelled formwork. This involves measuring, cutting and fitting timber, to the shape of the base in order to contain the concrete (as shown in the diagram).
Check diagonals to ensure the formwork is square. And also ensure the formwork is level, as this will determine whethery your base is 100% level.
Next, spread a layer of well compacted hardcore and cover with a liberal amount of sand.
 Step 4:
Next, mix concrete using one part cement to five parts ballast or use bags of dry-mixed concrete to which you just add water. Small amounts of water should be added at a time and mixed into the concrete mix to ensure excessive amounts are not added making the cement sloppy, as the concrete should be kept on the dry side.
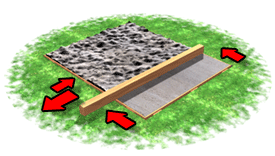
Spread the concrete evenly and slightly proud of the formwork. This can be then levelled off with a long straight edge of timber resting on the formwork using a sawing motion slowly (as shown below) over the entire surface of the freshly laid concrete.
 If wet weather is forecast, cover the concrete with polythene for 24-hours. In warm weather cover the base with damp sacks and sprinkle them with water over the 24-hour period, this will ensure the drying concrete will not shrink and crack.
The result is a smooth, sound, level base. The perfect foundation for the construction of a garden building.
Tools Required:
 Step 1:
As mentioned decide where to position the shed in an optimal space, allow enough distance from hedges or fences for easy access to all sides. Using pegs and string to mark out the base 2 inch (5 cm) larger than the area of the building on each side. Finally, a measure diagonal to ensure the area is square.
 Step 2:
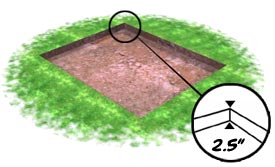
Strip the topsoil and dig out to a depth of approx. 2.5 inch (7 cm) to accommodate the base. Level the area and remove the pegs.
Mix together one part cement to eight parts building sand for a dry sand and cement mix. Spread this evenly ensuring that the mix sits approx. 4 cm in depth. Now, rake this to a level.
 Step 4:
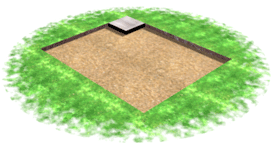
Starting from one corner and working outward, lay the slabs by tapping down on the centre of each slab with a rubber mallet. Using a spirit level, ensure all the slabs are square, level and firmly butted together for a solid base.
The completed base should now be level and square. Do one final check with a long straight edge to check if the base is level from each corner, and also measure the diagonals to finally check the base is square. Brush off any excess dry sand/cement mix, which could hinder the levelling of the shed. The result is a smooth, sound, level base. The perfect foundation for the construction of a garden building.