Jump to:
Does your shed get too cold in the winter and too hot in the summer? If yes, there’s one possible solution: insulation.
This guide is for anyone insulating a garden shed themselves. Our assembly experts share the basics and a simple step-by-step approach to help you get started.
Prefer a visual guide? Watch the video below, then use the steps here for more details.
How to Insulate a Garden Shed Floor
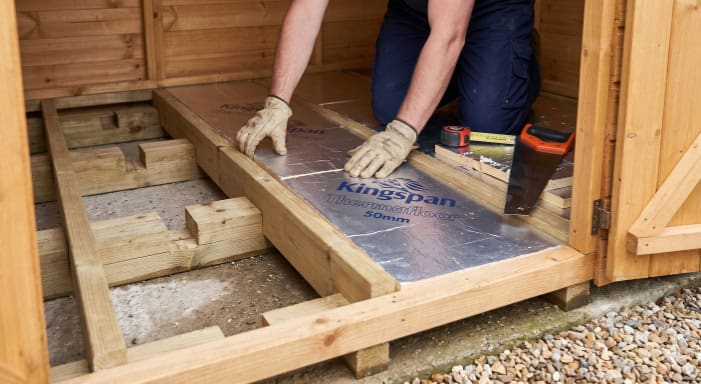
When building a shed from the ground up, insulating the floor is crucial to prevent heat loss. This could save up to 40% of the heat that might otherwise escape. Here’s what you’ll need and how to do it:
Materials
- Saw
- Tape measure
- Wood blocks
- PIR insulation boards
- Professional aluminium foil tape
- Low-expansion expanding foam
- Vapour control membrane
Instructions
- Treat the floor joists against rot before installing insulation. Fit pressure-treated timber blocks under each joist cavity to lift the floor. This keeps the insulation off the ground and reduces damp getting into the floor.
- Measure the inside width between the floor joists. Cut the PIR boards to size using a fine-tooth saw or jigsaw. The boards should fit with no gaps for cold air to pass through.
- Make the top of the PIR board level with the top of the joist. If there are small gaps between the board and the joist, seal them with expanding foam or aluminium tape. This stops thermal bridging, where cold air passes through gaps and reduces insulation performance.
- Before laying your final floorboards, install a layer of vapour control membrane across the top of the joists and insulation. Doing so stops condensation from rising through the floor and damaging your internal finish.
For existing sheds, consider the false floor method. A vapour barrier on the first layer, then rigid foam insulation, and finish with a sheet of OSB or plywood. The result gives the floor insulation and protection without touching the walls or original boards.
Get the full steps on how to insulate your shed floor with a false floor here.
Shed Wall and Roof Insulation
Shed wall and roof insulation are structurally similar, though performance varies by method.
Bubble wrap or foil
This is an inexpensive way to insulate the wall and floor – best for seasonal use.
You’ll need:
- Bubble wrap (or multi-foil insulation)
- Staple gun
- Utility knife or Jigsaw (for cutting boards)
- OSB board (or plywood)
- Nail gun or screws
Instructions:
- Cut the bubble wrap strips to match the exact height and width of your wall panels.
- Staple the bubble wrap to the interior face of the wall studs. Don’t pull it taut against the outer cladding. Leave a 25mm air gap between the wrap and the exterior wall to act as a thermal buffer.
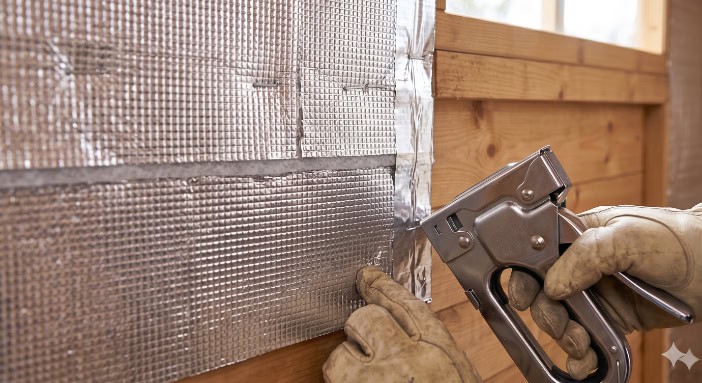
- Use aluminium foil tape over the seams to seal the edges where they overlap.
- Fasten OSB boards over the studs to protect the insulation and create a solid internal wall.
Fibreglass or mineral wool
A more effective insulation method for shed walls and roofs year-round.
Materials:
- Fibreglass or mineral wool batts
- Breathable vapour membrane
- OSB board
- Staple gun
- Heavy-duty scissors
Instructions:
- Staple a breathable vapour membrane across the interior wall panels. Pull it smooth to stop condensation from the outside reaching the insulation.
- Measure the distance between your studs. Cut the mineral wool or fibreglass slightly wider, about 10 to 20mm more than the gap.
- Insert the insulation into the stud cavities. Don’t squash or compress the material. Insulation works by trapping millions of tiny pockets of air; compressing it destroys its thermal rating (R-value).
- Fix the OSB boards directly onto the studs to secure the insulation and leave a clean internal finish.
Air Gap for Shed Insulation
When insulating, you must maintain an air gap between the insulation and the outer cladding. Aim for a minimum gap of 25mm for walls and 50mm for roofs. This will act as a buffer zone, preventing condensation from forming between your materials and the timber.
Use baffles on the walls
Baffles are rigid sheets installed between your wall studs.
Materials: Rigid plastic or cardboard baffles, a saw, and screws or nails.
- Measure the interior width of your wall studs.
- Cut the baffles to fit between them.
- Fix the baffles to the studs, leaving the required 25mm space between the baffle and the outer wall.
- Space them evenly so they don’t sag or move.
Soffit vents for roofs
Soffit vents allow air to flow from the outside into the roof cavity. This is critical for moving humid air out of your shed before it turns into liquid water.
Materials: Soffit vent covers, saw, silicone sealant, and screws.
- Measure and cut the vent openings in the shed eaves or soffits.
- Fix the vent covers using screws, and apply a bead of silicone sealant around the edges to ensure no water can enter the building.
Rigid foam placement
If you’re using rigid PIR foam boards, you can create an air gap by using battens to extend the frame.
Materials: Timber battens (25mm depth), screws, and rigid foam insulation.
- Screw 25mm timber battens directly onto the inside of your wall studs.
- Fit your PIR boards onto these battens to create a permanent, fixed 25mm gap between the insulation and the outer wall panels.
Note: An air gap only works when combined with insulation material, which provides the thermal resistance (R-value) needed to stabilise indoor temperatures.
How to Insulate a Shed on a Budget
If a full renovation isn’t possible, you can improve thermal comfort with smaller upgrades, such as:
- Draft-proofing: Apply silicone sealant to all joints and gaps where timber panels meet. Use expanding foam for larger, structural cracks around window and door frames to stop cold air infiltration at the source.
When draft-proofing, you’re sealing the building. Make sure there is still ventilation, such as wall vents, to stop moisture from building up and causing rot.
- Secondary glazing: Apply clear adhesive window film or plastic stretch wrap to single-pane glass. This creates a small, dead-air pocket that reduces heat loss through conduction.
- Floor barrier: If a full false floor is not possible, lay a heavy-duty plastic moisture barrier directly over the existing floorboards, then place a rug or heavy matting on top. This quick method stops damp rising through the floor and adds a thermal layer underfoot.
How Much Insulation Do You Need?
To work out how much material you need, calculate the total internal surface area (m²/sqm) of your shed.
- Multiply the length by the height of each wall, and the length by the width of the floor and roof panels.
- Always add 10% to your total square metre calculation. This allows for beams, corners, and off-cuts during installation.
- Use the maximum thickness that your frame depth allows. For instance, if your wall studs are 50mm deep, use 50mm insulation boards. This ensures a friction-fit that eliminates gaps for thermal bridging.
Larger sheds, such as a 20×20 unit, require more accurate material calculations to maintain structural strength and consistent insulation (R-value) across all surfaces.
Round-up
Insulating your garden shed improves comfort and energy efficiency over the long term. Follow the steps, focus on areas where air enters and heat escapes, and your shed will be suitable for year-round use.
Disclaimer: This guidance is general. Actual results depend on the shed design, materials, and how it is installed.
Ready for an upgrade? If you’re tired of retrofitting, we have quality insulated garden rooms for you to choose from, ready to use all year round.


