Jump to:
Build the playhouse that lives in your child’s imagination and make it a reality. With only a couple of steps, you can create an outdoor playpen that your little ones will love for years! Design and decorate it with them to make the process more fun and memorable. Are you ready?
Step 1: Build the floor frame of your Wendy house
Begin by building a frame for the floor using pressure-treated joists. Cut and attach, and secure them together using nails. Mark the corners with stakes, then set aside the completed frame for the next step.
Note: Pressure-treated joists are resistant to decay, insects, and moisture. This treatment is suitable for outdoor use where it may be exposed to the elements. It can guarantee the structural integrity and longevity of the playhouse project.
Step 2: Level the foundation
Prepare the area where the floor frame will rest by levelling it (use the stakes as reference points). Fill the space with sand and lay flat paving stones. Use a level or string to ensure uniform height across all stones.
Step 3: Install porch posts
Start affixing the first porch to the outer joist. Ensure it stands upright without any slant. Drill through both the joist and the post, then secure them using bots, washers, and nuts. Repeat this process for each post.
Tip: Opt for galvanised nuts and bolts for enhanced durability against weather conditions.
Step 4: Lay down the floorboards
Pressure-treated decking works great against moisture and insects. Trim the boards to fit around the posts, using a jig saw for precise notches. Secure them in place using galvanised screws.
Tip: Place strips of roofing felt between the floorboards and posts for insulation. This also adds an extra layer of weatherproofing and reduces squeaks.
Step 5: Construct the walls
Build each wall separately on a flat surface, nailing the basic structure together. As you finish each wall, screw them into place through the bottom plate and into the floor. Although the walls might feel a bit shaky initially, they will become sturdier in the next step.
Step 6: Add sheeting for stability
Choose suitable sheeting material and cut it to fit the walls precisely. Secure the sheeting onto the outside of the wall studs using a nail gun, spacing nails about 16 inches apart. This step enhances the wooden playhouse’s stability and no more wobbling!
Tip: Consider plywood or oriented strand board (OSB) for sheeting material. Both options offer strength and durability at a reasonable cost.
Step 7: Construct and install roof joists
Set up a simple jig on the floor of the playhouse to construct the roof trusses and attach the gussets. This jig can be easily removed once the project is finished. After building the trusses, place them in position and secure them at the bottom of the eave. Similar to the walls, they will gain significant stability once the sheeting is added.
Note: A jig is a tool used to hold workpieces in place to ensure accurate and consistent results. In this context, it’s being used to assist in constructing roof trusses.
Gussets are triangular in shape and are secured to the joints using nails or screws. They provide extra support to the truss structure.
Step 8: Roof installation
After placing all the trusses, cover the roof with sheeting just like you did for the walls. Attach an aluminium drip edge along the edges to stop water from getting underneath. Next, roll out the green mineral felt from the bottom edge upwards and staple it down. Layer the shingles over the felt, starting from the bottom, to complete the roof. With this, your playhouse is well protected against rain, snow, and wind.The Final Round-up
Step 9: Set the windows in place
Install windows from the outside, placing them directly against the exterior wall. Seal the flange between the wall and the window with caulk. Then, secure by driving roofing nails through the nailing flange into the frame. Once secured, add a 1×4 frame around the window to give it a finished appearance.
Step 10: Build a porch railing
Use a prefabricated railing system. Start by bluing the balusters into position and secure them with nails for stability. Once assembled, place it onto the porch and attach it to the posts installed in Step 3 for a sturdy finish.
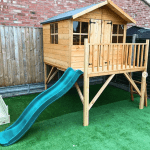
Congratulations on completing your playhouse project! Now, it’s time to personalise it with your kids. Paint the structure in their favourite colours and adorn it with decorations. Furnish the interior with their toys to make it truly theirs.
When they’re ready for a new playhouse adventure, explore our range of Wendy houses. If you have any further questions, please don’t hesitate to contact us at 01909 768840.
Up next on your reading list: 5 Best Kid’s Playhouse Decorating Ideas


