Jump to:
Shed ventilation means there’s good air circulation and less chance of condensation. This promotes a healthier environment for both the structure and its contents. Learn the basics and get practical tips to optimise airflow in your garden building.
What Are My Shed Ventilation Options?
Here’s a look at the different shed ventilation options and what each one does, so you can pick what fits your shed.
And if you don’t have your shed yet, here are some fantastic options…
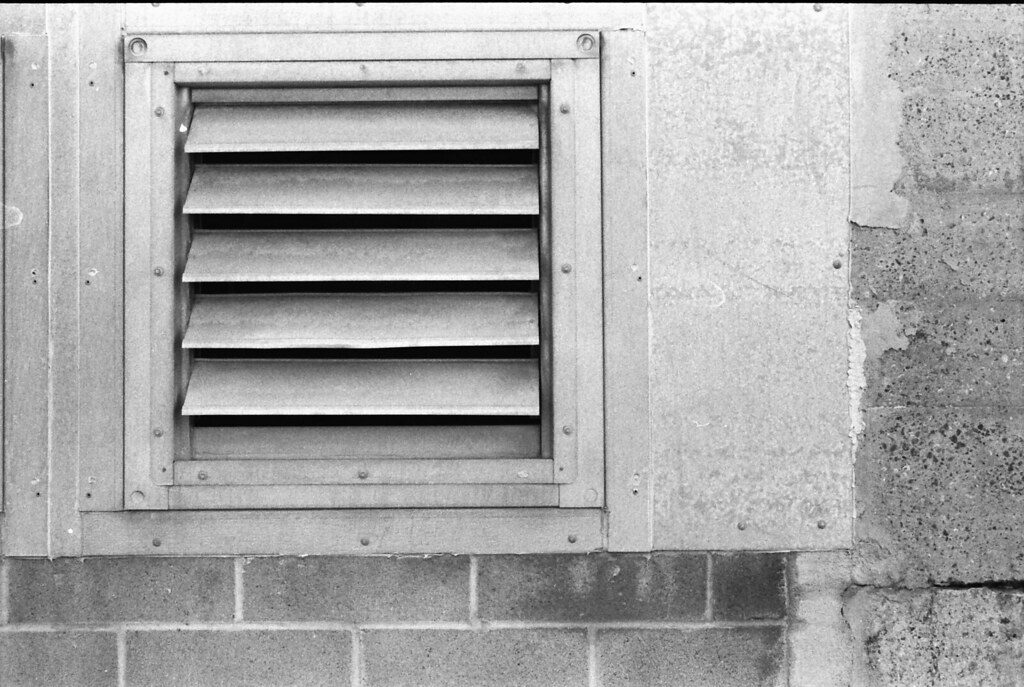
1. Wall vents
Wall vents are openings installed in the walls of garden sheds. They are rectangular or square in shape and come in various sizes. These vents serve a crucial function in ventilating the shed by allowing air to flow in and out.
They maintain proper airflow within, preventing stale or damp air accumulation. This helps to regulate the temperature and humidity levels inside the shed. Such solutions are crucial for wooden sheds, as excess moisture can lead to rot and decay.
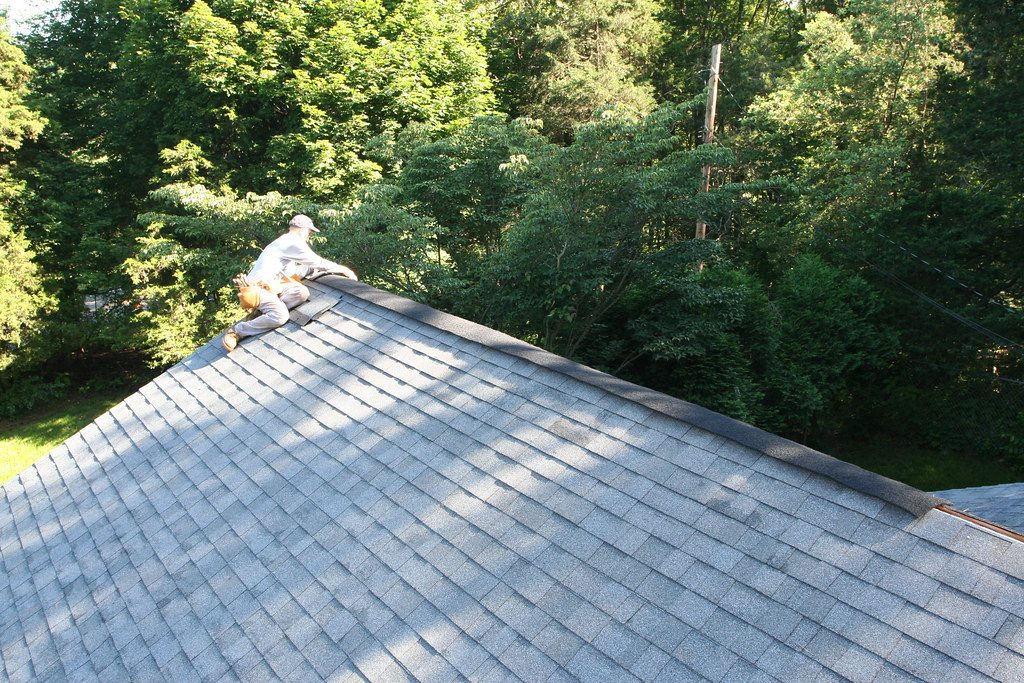
2. Ridge vents
A ridge vent is a type of ventilation system for sheds that is installed along the peak or ridge of the roof. It typically looks like a narrow, elongated opening running along the top, e.g. on a shed roof apex. This vent helps with shed ventilation by allowing hot air to escape from the attic or upper space of the shed.
As hot air rises, it exits through the ridge vent. This, in turn, creates a natural airflow that draws in cooler air from lower vents or openings. The process also helps reduce humidity, preventing moisture buildup and mould in shed.

3. Venting skylight
Venting skylights are windows installed on the roof that can open and close. They look like rectangular or square windows on the roof. These skylights help with ventilation by allowing hot air to escape the shed.
When opened, they let hot air rise and exit through the skylight, creating airflow. This circulation draws in cooler air from other shed openings, like wall vents or windows. The structure will be less prone to becoming hot and humid, keeping the interior fresh and dry
4. Turbines
Turbines are devices installed on shed roofs that spin to create airflow. They look like small, cylindrical vents with fins or blades on top. As the wind blows or hot air rises, the turbines spin. This spinning motion draws air out, helping to regulate temperature and reduce humidity.
Turbines circulate air using natural forces. They are simple and efficient solutions for improving shed ventilation without using electricity.
5. Natural ventilation
Natural ventilation using windows relies on openings to let fresh and stale air out. Simply opening windows on opposite sides of the shed allows air to flow through. This method is effective because it harnesses natural and continuous airflow. Moreover, it’s beneficial as it doesn’t require any mechanical devices or electricity.
These are the most common options, but there’s another route if you want to avoid moisture issues long term. Pressure treated sheds handle damp conditions better and need less upkeep.
How to Ventilate My Shed?
Now you’ve got options, here are some shed ventilation steps and tips to help you get started:
Step 1: Assess your outdoor shed
Start by evaluating your shed’s ventilation. Look for existing vents and windows, noting their locations and effectiveness. Identify areas where airflow seems restricted or inadequate. Consider adding vents or optimising window placement to improve airflow throughout the shed.
This assessment helps you understand the current ventilation situation. It’ll enable you to make informed decisions about necessary improvements.
Step 2: Determine ventilation needs
Consider the size and location of your shed and your local climate to find the right ventilation. Key considerations include:
- If your shed lacks proper ventilation, install wall vents or windows. These facilitate fresh air entry and stale air exit for optimal airflow.
- For sheds with sloped roofs, consider ridge vents or venting skylights. These options allow hot air to escape through the roofline, enhancing ventilation.
- Opt for turbine vents in sheds prone to condensation or chemical use. This method removes excess moisture and maintains air quality, creating a vacuum effect. Maximise natural ventilation by creating openings for air movement.
Not sure if your current shed is worth upgrading? Use this guide to compare sizes, materials, and features before you commit.
Step 3: Installation
Prepare to optimise your shed ventilation with these simple installation steps:
1. Wall Vents or windows
- Measure and mark where you want to install the vent or window.
- Cut a hole in the shed wall according to the measurements.
- Install the vent or window frame securely using screws or nails.
- Seal around the edges with caulking or a silicone gun to prevent air leaks.
2. Ridge vents and venting skylights
- Measure and mark the ridge of your shed roof for the vent installation.
- Cut a continuous slot along the ridge line for the ridge vent.
- Place the ridge vent along the slot and secure it with screws or nails.
- For venting skylights, follow the manufacturer’s instructions for installation on the roof. Ensure proper sealing to prevent leaks.
Disclaimer: Poorly installed vents can do more harm than good. In some cases, they may even affect your shed’s warranty, as incorrect fitting can lead to trapped moisture and mould rather than preventing it. Always follow the manufacturer’s instructions or get a professional to install vents if you’re unsure.
3. Turbine vents
- Determine the ideal location on the roof for maximum airflow.
- Securely mount the turbine vent base to the roof using screws.
- Attach the turbine head to the base and ensure it spins freely.
- Seal around the base and edges of the vent to prevent water leaks.
Step 4: Ensure proper vent placement
After installing vents, make sure they’re in the right spots. For wall vents or windows, place them where air can flow well. Ridge vents and skylights should be on the highest parts of the roof. For turbines, ensure they’re on the roof where they can spin freely.
Proper placement helps air move around your shed, keeping it cool and dry. Take a moment to check and adjust if needed.
Step 5: Regularly clean and maintain shed ventilation
Keep your vents clean and free from debris to maintain optimal airflow. Regularly check for any obstructions or blockages that may hinder ventilation. Inspect the seals around windows and doors, fixing gaps to avoid drafts.
Tips: Installing a solar-powered vent fan can enhance ventilation on sunny days. Position the shed to take advantage of winds for natural air exchange.
Round-up
Air circulation, as well as additional airflow sources, are important for sheds. When you know which type of ventilation suits your shed best and how to do it, you can let your outbuilding breathe. We hope this post has answered your questions on shed ventilation.
Note: Shed ventilation and preparation can be a bit different in the wintertime. For reference, use our guide to winter shed preparation. Next on your reading list: A Guide on How to Damp Proof a Shed
If you have any further questions, contact us and don’t hesitate to give us a call at 01909 768840.


