Jump to:
So, you’re planning to set up an outdoor office shed, or otherwise use a log cabin or other kind of outbuilding as your new work-from-home setup. But to do that all year, you’re going to need insulation. Here’s our quick guide for how to add insulation, so you don’t have to waste money running a heater on maximum setting all day.
This guide doesn’t go into the most intense detail (after all, every outdoor office could have different measurements), but it provides a good overview of what the process consists of. Note that modifying a garden building is done at your own risk and can void the manufacturer’s warranty.
And if you’re still looking for your new building, check out our range of garden offices.
Why Insulating Your Garden Office Pays Off
No one wants to shiver through calls or hide under a blanket just to get a bit of work done. An insulated garden office changes all that.
Here’s what insulation does for you:
- Keeps the cold out and the warmth in. No more starting the day frozen or finishing it dripping with sweat.
- Save on heating bills.You won’t need to turn the heater up full blast to stay warm.
- Stops damp and condensation. The timber wall panels, including your electronics, are safe from sneaky moisture.
- Cuts out noise. Ah, to be able to concentrate without the neighbour’s leaf blower making an unwelcome cameo!
Even a little insulation can stop your garden office feeling like a no-go zone.
What You’ll Need to Insulate Your Garden Office
Get your garden office insulated the right way with these basic tools and materials:
- Insulation boards or rolls. Boards suit solid timber walls, while rolls are easier for slanted roofs or corners.
- Timber battens. They hold the insulation and give the panels something to fix onto.
- Interior wall panels. Plasterboard or cladding tidies up the walls and protects the insulation.
- Fixings and adhesives. Scews, nails, foam adhesive, silicone sealant, anything that holds everything together.
You should also seriously consider upgrading to double glazed windows if you don’t already have them. This should be a simple process of removing the existing windows (frames and all) and replacing them with double glazed units of the same size.
Step-by-Step: How to Insulate Your Garden Office Walls
Right, it’s time to do the real work. But don’t worry, it’s easier than it looks.
1. Check for ventilation on the outer wall
Once you’ve taken this step, you can’t really uncommit from the project, so be certain before you begin. For each section of insulation, a small hole near the bottom and one near the top will provide some airflow so that you don’t get moisture (and then mould) trapped behind your insulation.
Prevent insects from entering your ventilation holes by using grille-style covers.
2. Add some framing (if you don’t already have it)
Line the walls with timber battens. These give the insulation something to slot into and the panels something to attach to. Make sure the gaps are even for the next step.
You should also fit some thin wooden bars between the framing which will hold the insulation slightly offset — it should not sit snug against the wall. This creates an air gap so that the ventilation aspect can function.
Note: Timber buildings such as log cabins naturally expand and contract with seasonal humidity changes. Rigidly fixing new framing to the wall can restrict this movement, leading to splits or structural stress. Fit any added framing so that it can move slightly or be loosened and retightened as the timber adjusts through the year.
3. Fit the insulation
Cut your insulation material to size and tuck it into the spaces between the battens. Refer to the manufacturer’s instructions if you’re unsure. It’s straightforward, but a little guidance goes a long way.
It’s important to ensure everything stays dry during this process.
4. Add a vapour control layer (VCL)
Now you need to keep the insulation dry from the inside. Stick some VCL sheeting over your insulation and make sure it’s tightly fitted. You’ll want it as airtight as possible.
5. Install the inner wall panelling
Attach plasterboard or cladding over the insulation to tidy up and for protection. Seal the edges with silicone to stop draughts sneaking in. Once this is done, you can begin decorating your new interior wall.
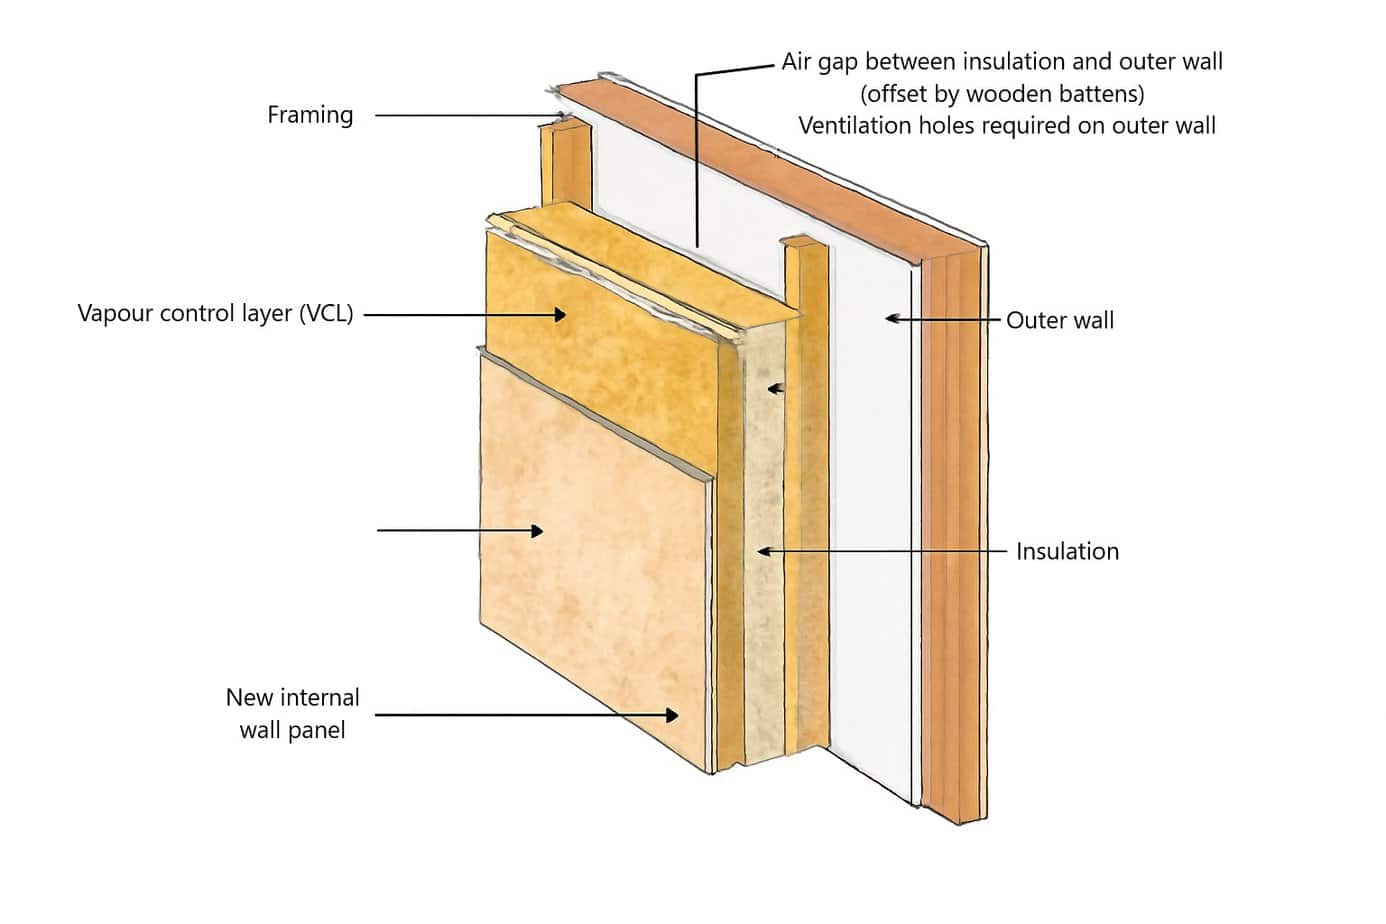
Here’s a diagram of what the insulation should consist of:
Insulating a Garden Office Floor and Roof
Walls are important, but the cold loves shortcuts. Don’t let it slip through the floor or roof!
Floor
If your office sits on a concrete base, use moisture-resistant boards or rolls. Lay them down, add battens, and cover with plywood or boards. It’s the simplest way to stop cold seeping up from the floor.
Roof
Slot insulation between the ceiling joists and cover it with plasterboard or cladding. This keeps heat in during winter and stops the room overheating in summer.
Give yourself a pat on the back—your garden office just got a serious upgrade. Or, take the easy route next time.
Go for a Ready-Insulated Garden Office
If modification isn’t for you, an insulated garden room gives you all these benefits straight away. Our insulated models come with:
- Fully insulated walls and roof panels
- Double-glazed windows and doors
- Sturdy timber construction built to last
- Comfort all year round, whatever the weather
- Easy installation
One option worth a look is the BillyOh Canvas Insulated Garden Room. It’s more affordable than you might think and comes with everything you need for a cosy, year-round space. Perfect for a home office, studio, or a quiet spot to relax.
Explore our insulated garden rooms today for the full range.
Or give us a call on 01909 768840 for inquiries. Our team is happy to help with any questions.
FAQ
Do I need to insulate my garden office?
If you want to use it all year, yes. It keeps your workspace warm enough in winter and cool in summer. Bonus: you won’t have to hide under jumpers or fan yourself while working.
Can I add insulation to an existing garden room?
Yes, you can. Most garden rooms can be upgraded with insulation panels, especially kits like ours. If you’d rather skip the work, an insulated garden room is the easiest way to go.
Can I paint or finish insulated walls?
Yes. Once you’ve added plasterboard or cladding over the insulation, you can paint it however you like.


