Jump to:
A log cabin is an expensive investment, and the mistakes that ruin one are almost always preventable — they just need to be spotted before it’s too late. We’ve inspected enough customer-installed cabins to know exactly where things go wrong: the base that’s unlevel, the paint applied too early, the back wall that nobody can access to maintain. Here are the seven mistakes we see most often, what they actually cost, and how to avoid them.
If you’re doing this for the first time, we want to help you get it right. So, our team has compiled a list of these pitfalls, explaining each in detail—why it happens and, of course, how to fix it.
This goes for all types of garden log cabins.
Building Too Close to the Boundary
The first mistake is trying to use every inch of space by placing the log cabin right up against a fence or wall. This is a recurring oversight, often made when trying to maximise space. The problem is that when the structure is too close to the boundary, it can’t breathe.
Timber buildings require airflow to stay dry. Without this, before long, there will be mould forming on the back wall where you can’t see it. By the time the rot shows, it may be too late to fix. Plus, if you can’t get a brush back there to treat the timber, the weather ends up doing damage you can’t reverse.
Look at this example from one of our customers. The side log boards have warped and tilted because it’s been built right up against a fence.
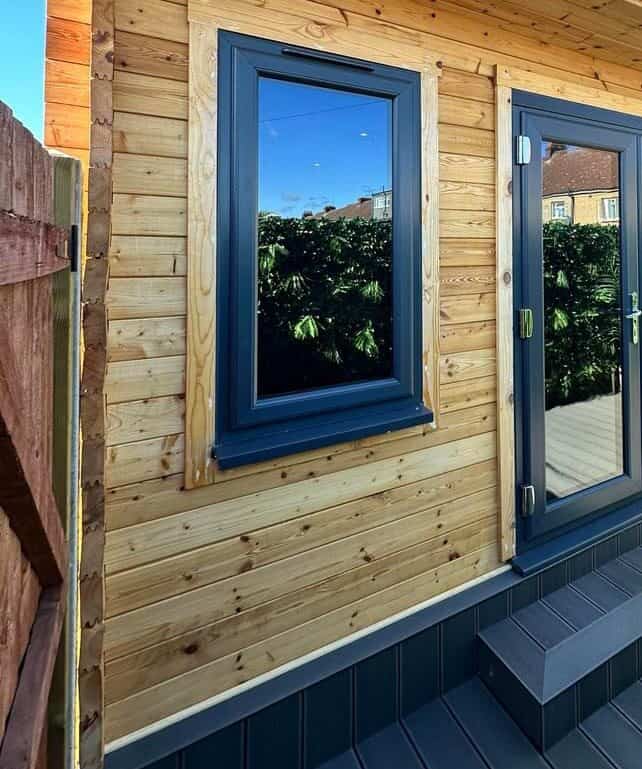
The solution: You need a minimum of 2 feet (60cm) of clear air around the entire perimeter. We’ve seen cabins become mould traps simply because the owner couldn’t reach the back wall with a paintbrush. If you can’t reach it, you can’t protect it.
Leaving your timber untreated
You can’t build or put up a log cabin and not bother treating it until next summer. Leaving it exposed to the British weather for even a few weeks is when the rot trap begins.
Rain and UV rays will cause the fibres to swell and crack. Once moisture gets deep into those raw joints, the wood starts to decay from the inside out.
The solution: If your log cabin isn’t treated or tanalised at purchase, you must treat it with a high-quality preservative immediately after assembly (and every year after). But if you want less upkeep and better protection from the start, there’s a better option.
You can opt for this as an upgrade from the standard to the pressure treatment add-on, but expect a slightly longer manufacturing time. With a 15-year extended guarantee, the log cabin is protected against rot, decay, and insects from the moment it arrives.
Skipping the Base
It doesn’t matter how thick your logs are if the ground beneath them isn’t dead-level. A log cabin is a heavy, interlocking system. If your base is off by even 10mm, gravity will eventually win.
As the base tilts, the interlocking logs no longer sit flush against each other — gaps open at the corner joints, the tongue-and-groove between courses comes apart, and the structural integrity of the whole wall is compromised. If you are adding heavy loads for a garden gym or a bar with a fridge and stock, the extra weight can speed up movement in the base.
The solution: You SHOULD never build directly on grass or uneven ground. You need a solid foundation that spreads the load. Whether you’re pouring a concrete pad or using a timber frame, the base must be 100% level and slightly raised to keep moisture away from the floor joists.
Use our best log cabin base guide to match your ground conditions to the right structural support.Painting the Pressure Treated Timber Too Early
You might want to get the colour on and make your cabin extra pretty – we totally get it. But if you’ve gone for a pressure-treated one, the best thing you can do is give the timber a bit of time before finishing it.
Pressure-treated wood arrives with a high moisture content. If you slap paint on it right away, you’re sealing that moisture inside. The paint will peel and bubble within weeks, and worse, the trapped moisture can cause the wood to decay.
The solution: Give it 3 to 6 months to settle (depending on how wet the weather has been). Once the timber has seasoned, try the water test: sprinkle a few drops on the logs. If it beads, the wood is still too saturated to absorb the paint; if it soaks in, the pores are open and ready for painting.
Follow our guide to Painting Pressure Treated Wood for more.
Choosing the Wrong Location
Many cabin owners overlook key factors like sunlight, drainage, and accessibility.
Some people place it in a shaded corner to keep it cool on hot days, but without enough sunlight, it can become damp, mouldy, and dark inside. Others put it too close to trees for extra shade or privacy, only to face problems like falling debris, root damage, and blocked gutters. Some even position it at the lowest point in the garden to make use of unused space, not realising that water will pool around the base.
The solution: A well-thought-out spot makes all the difference. Choose a location with good drainage, plenty of natural light, and enough space for maintenance access.
Not Applying a Protective Finish
There’s a common misconception that if a cabin is pressure treated, the job is done. This type of treatment helps prevent water from leading to rot and insect damage inside the timber, but it doesn’t stop the water from getting in there in the first place.
The solution:
- For an untreated log cabin, you need to apply wood preservative followed by a water-repellent topcoat.
- For pressure-treated, you’ve started with the best defence against rot, but you still need to manage the movement of the wood. After the initial seasoning period, apply a UV-resistant oil or sealant to stop the logs from drying out and splitting in the heat.
Don’t wait for the wood to look worn or dry. Check it once a year, and this can save you from a massive sanding and restoration job five years down the line.
Not Allowing the Wood to Move
Timber is a living, moving material. Even with the best protective oils, your cabin will grow and shrink slightly between the humid winters and dry summers. Yet, many still treat the log walls like solid bricks (e.g., fixing heavy shelving, TV brackets, or conduit).
When you fix two logs together with rigid brackets, you restrict how the cabin moves. As the timber shrinks in the sun, it pulls against the fixings, which can cause cracks or gaps as the logs are forced out of position instead of settling naturally.
The solutions:
- If you’re hanging a picture frame or a small light, try to keep the fixings within a single log.
- If you’re adding internal walls or door frames, they must be floating. Never nail a vertical batten tightly to the logs from top to bottom.
- For heavy items like cabinets or large TVs, use expansion slots or sliding brackets. These allow the screws to move as the logs shift, so the cabin can expand and contract naturally.
If you see a small gap above a door or between logs in the first year, don’t panic. It’s usually just the cabin settling. Learn more about log cabin expansion and contraction next.
Warranty Warning: What’s Covered and What Isn’t
Several of the mistakes can and will void guarantees, if they directly cause rot and decay due to a lack of care. A warranty covers manufacturing faults, not issues caused by installation, maintenance, or changes made after delivery. Here’s what can affect it:
- Poor foundation that can lead to gaps, warped doors, and movement in the structure. This is considered an installation issue.
- Fixing rigid items that stop natural movement and cause spilling. This isn’t classed as a product fault.
- Making modifications, such as cutting parts or altering how the cabin was designed, can affect the warranty.
- Skipping treatment, such as sealing or weatherproofing, leaves the timber exposed and prone to deterioration, which isn’t covered. With a pressure-treated cabin, ignoring the correct timing can accidentally void your warranty.
Round-up
If you’re installing or building a log cabin, make sure it’s not too close to the boundary. You need that airflow and maintenance access to prevent hidden rot.
If you’ve gone for the added protection of a pressure-treated cabin, wait at least 3 to 6 months before painting. And don’t forget the base, will you? Once it’s all set, keep it looking good for years with a protective finish.
Now that you know how these builds can go wrong, you can avoid the common mistakes and make the most of your investment.
This next guide will help if you’re torn between going the DIY route or hiring a professional: Building a Log Cabin – Should I Self Assemble or Hire a Builder?


