Jump to:
Building a sturdy base is an important first step of installing your new shed, and that often means digging—but not in every case. Sometimes you just can’t—the ground might be too tough, the area too large, or your back might say no chance.
The good news is that you can still build shed foundations without digging. This guide will walk you through the options, including tips on how to build a shed floor on skids.
3 Methods for Building Shed Foundations Without Digging
Here are the best ways to get your project off the ground when you’d rather skip the heavy excavation.
Gravel pad + skids (floating foundation)

For this setup, you’re basically creating a flat bed of gravel, then resting treated timbers on top.
- Mark it out: Use a string or timber to outline where your gravel will go. Frame this area with treated wood or landscape timbers to keep the gravel from spreading out.
- Weed control: Roll out heavy-duty geotextile fabric before tipping the stones in. This stops weeds from poking through and prevents your gravel from sinking into the soil.
- Pour the gravel: Use ¾” clean gravel or crushed stone (avoid smooth pea gravel). Pour it in a few inches at a time, then compress it with a hand tamper or a heavy board. Don’t skip this; a solid base starts with good compaction.
- Positioning: Lay your skids on top of the gravel. Check for level across both skids. If one end is low, slide in more gravel underneath; if it’s too high, scrape some out.
With the skids level, you’re ready to place the shed.
In windy areas or with taller sheds, fix the frame to the skids at each corner using metal brackets or heavy-duty straps. Keep the fixings tight and evenly spaced to prevent lift or shifting in strong winds.
Concrete blocks or pier blocks (no trenching)
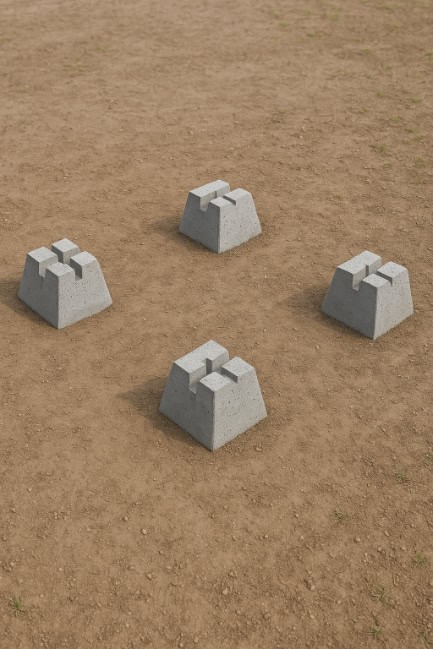
This is a great route if you want to avoid moving massive amounts of soil. You’re using precast concrete blocks or pier pads as the support points.
- Placement: The corners are where the shed’s weight is concentrated. Place a block under each corner on firm, compacted soil – or better yet, a small bed of gravel.
- Don’t let it sag: If you have a larger shed, the middle of the floor can bow. Add extra blocks along the sides to support the joists. You wouldn’t want a long table with only legs at the corners.
- Levelling: Take your time for this step. Rarely will your blocks be perfectly level on the first try. Use shims, wedges, or flat stones to nudge them into position until your beams sit perfectly flat.
After the blocks are set, run your beams or floor joists across them. Check the level again before fixing anything in place.
Pro tip: Use wider pier pads if your soil is soft or prone to holding water. They spread the weight to prevent the shed from sinking. Also, be mindful of height. Avoid using overly tall blocks that might push your structure above the shed planning permission rules.
Using a skid foundation for a shed (minimal prep)
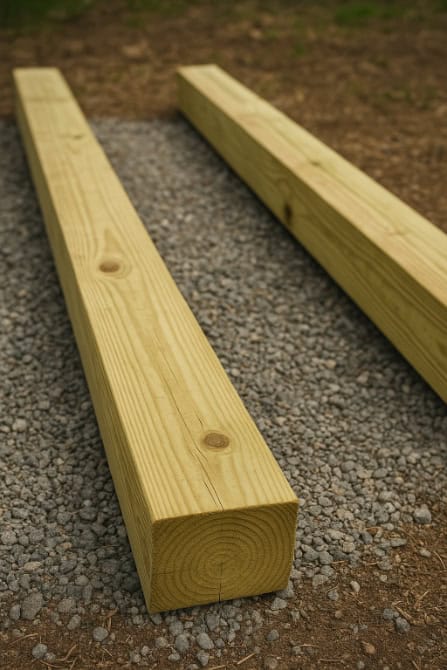
This is the fastest way to get a shed standing without much groundwork. You’re essentially building a shed floor on skids that sit on the surface or a thin layer of gravel.
- Check the site: The ground has to be fairly level for this to work.
- Spacing: Lay the skids in the same direction you want your floor joists to run. For smaller sheds, two skids do the trick. Go for three or more if the shed is bigger; the more support, the less chance of the floor sagging.
- Levelling: Use a small jack, wood shims, or flat stones to level the skids under low spots. Adjust each skid until they line up.
- Stability: Skids can slowly sink when they sit directly on bare ground. Slow this down by laying a strip of compacted gravel under each skid before positioning the timber. Pack the gravel, then place the timber on top of it. If a section still feels soft, backfill more gravel under that spot.
This method won’t create a permanent shed foundation, but it’s strong enough for lighter sheds. It also makes it easier to move the structure later if you change its position.
When “No-Dig” Still Needs Light Digging
Even with these methods, the ground won’t be suitable for a shed base. There are likely thick grass, soft soil, or a high spot that gets in the way.
- Scrape off the top layer of turf using a hoe or flat shovel.
- Don’t dig deep; just shave enough for the blocks, skids, or timbers to sit flat.
It only takes a few minutes, but it’s still far easier than digging full trenches. If you ever need to dig, refer to this guide on how to build a shed base.
FAQ
What are skids on a shed?
Skids are long, heavy-duty, pressure treated timbers that sit under the shed. They run along the base and support the floor, spreading the weight across the ground. They’re a non-digging alternative to concrete bases, keeping the shed raised to stay level and off damp ground.
Can you put shed skids directly on the ground?
Yes, you can, as long as the ground is level and drains well. The timber used for skids must also be pressure-treated, so it can handle contact with the ground.
However, soil can soften or shift, causing movement over time, which can affect the level of the shed. Adding a thin layer of gravel under each skid helps reduce this, giving a firmer base.
How to build a shed floor on skids?
Once the skids are laid and levelled, position the shed floor frame on top.
- Position the floor frame so the weight is spread evenly across all the skids, not just the edges.
- Fix the frame down using brackets or screws to stop movement.
- After that, lay and secure the floor boards (if not already attached in the kit).
- Check the level again before fully tightening anything. It’s easier to adjust while the fixings are still loose.
Most wooden shed kits already include a pre-built floor or floor joists – no need to build from scratch.


