Jump to:
A concrete shed base does its job, but when it’s time for a change, it turns into an obstacle to remove. This can happen whether you’re taking down your garden storage or using the space in another way. We’ll take you through the steps to get started.
5 Steps for Removing a Concrete Shed Base
With the right tools, you can carry out this project yourself. These include:
- Sledgehammer
- Bolster chisel
- Crowbar
- Strong gloves
- Safety glasses
- Wheelbarrow
- Skip or rubble sacks
Have these ready, and you’re set for step one.
Step 1: Prepare the ground
- Clear anything sitting on or around the base before starting
- Check underneath and nearby for pipes, cables, or hidden services (do this once the shed moving process is complete)
- Put on PPE, including gloves and safety glasses, before any breaking work starts
You’re ready for the next step!
Step 2: Break the base
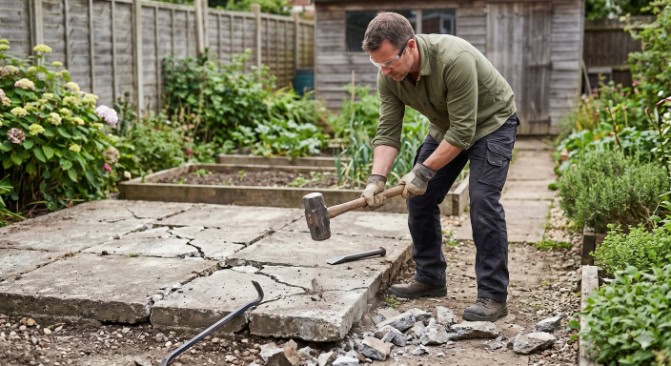
- Start at the edge of the slab with a sledgehammer
- Don’t try to break large sections at once
- Work in spaced-out strikes across the surface to weaken multiple points
- As cracks appear, place a bolster chisel into them and tap it to widen the break
- Use a crowbar to lift loosened sections from the edge
- Move across the slab gradually, breaking it into manageable chunks
This will leave you with a pile of concrete ready for removal.
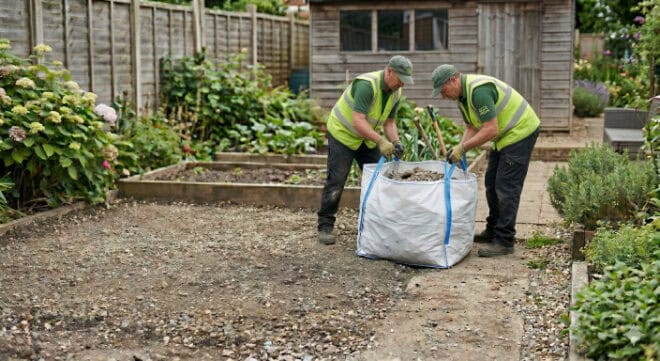
Step 3: Remove concrete bits
- Start with the smaller chunks first, then move on to the heavier pieces
- Place rubble into sacks and load into a wheelbarrow
- Don’t overload sacks or the wheelbarrow; stick to the recommended weight limits
- Tip the waste into a skip or stack it neatly for collection
Step 4: Clear the ground
When the last chunk of concrete is out, the job’s not over yet.
- Run through the area with a rake or shovel to get rid of leftover rubble (otherwise, they’ll only get in the way later)
- Level out any uneven patches so the ground is flat
- Decide on the next use for the space, such as turf or seed for a lawn
For a shed replacement, you can put in a new base, such as gravel or slabs. If you have limited room, our small sheds are easy to install.
Step 5: Dispose
Here are a few routes for concrete shed base rubble disposal:
- Skip hire: Useful for larger amounts. A skip is dropped off, you fill it with rubble, then it’s collected and taken away
- Recycling centre: Most tips accept concrete, but check the rules first and whether booking is needed. Good option if you’re happy making a few trips
Again, rubble bags are your best bet for collecting piles. Sling them in the boot for a trip to the tip, or book a collection if that’s easier.
Round-up
Removing a concrete shed base takes effort, but it’s completely doable with these steps. Whether you’re opting for a traditional wooden shed for storage or turning the area into a seating space, the hard part is over.
Now you can focus on choosing the right building for your new, level site.
FAQ
How thick is a standard shed base?
Usually between 3 and 4 inches (75mm to 100mm). If it’s thicker than 6 inches or reinforced with steel mesh, you might need to rent a jackhammer instead of a sledgehammer.
Can I build a new shed directly on the soil after removing the concrete?
No. Timber needs airflow and a level surface. Even a pressure treated shed will eventually rot if sat directly on damp soil. Always put down a new base of slabs, gravel, or a timber frame.
Do I need a permit to hire a skip?
If the skip is sitting on your driveway, no. If it has to go on the road or a public verge, you’ll usually need a permit from your local council. Most skip companies can arrange this for you.


