Jump to:
A cold shed floor can be prone to damp, which isn’t good for timber boards. Removing it isn’t an option for most sheds because the walls sit on it. This guide explains how to add insulation on top or underneath without major demolition.
Why a False Floor Is the Easiest Way to Insulate an Existing Shed
For this shed floor project, we’ll go for the ‘false floor’ method. Here, we’ll create a new floor layer on top of the existing boards.
A vapour barrier on the first layer, then rigid foam insulation, and finish with a sheet of OSB or plywood. The result gives the floor insulation and protection without touching the walls or original boards.
Just a heads-up, though! The new floor adds thickness, so you’ll lose a small amount of headroom. You may also need to trim the shed door slightly to clear the thicker floor.
Also, note that this is a major modification, and it could void your shed’s guarantee. Check your warranty to confirm what’s covered before making changes.
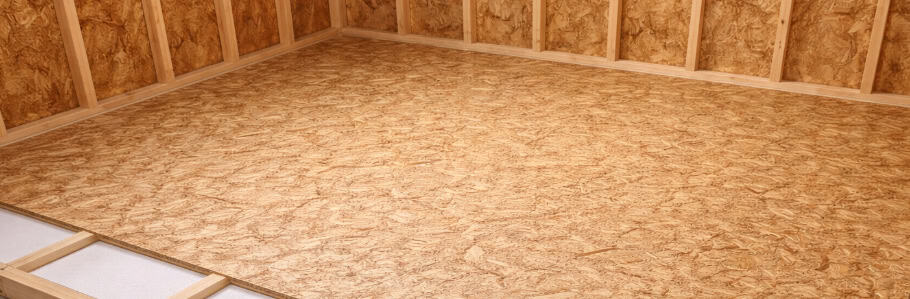
How to Insulate Your Shed with a False Floor
Since the original floorboards can’t be removed without dismantling the shed, take your time measuring and planning. Start with:
1. Measure your shed floor
Get the dimensions for the insulation boards and the top layer using a measuring tape. Do this twice to get accurate numbers, and mark where boards will meet so everything is level and even.
2. Fit the insulation boards
Cut rigid foam boards (e.g., PIR or XPS) to fit across the floor, flat on the polythene, and stagger joins if possible to strengthen the floor. Push them into corners and along edges to remove gaps.
3. Lay the vapour barrier
Roll out a polythene sheet over the top of the insulation. Seal edges against the walls and overlap sheets if you need more than one.
The vapour barrier stops warm, moist air from inside the room (like condensation from your breath or a heater) from travelling down into the cold insulation and rotting the wood below.
(Pro tip: If you are using foil-backed PIR boards, you can skip the plastic sheet and simply seal all the board joints tightly with aluminium foil tape).
4. Add the top layer
Place Tongue and Groove (T&G), OSB, or plywood sheets (15 – 18mm recommended) over the insulation. Do not use screws. Driving screws through the boards will puncture your vapour barrier, crush the insulation, and create “cold bridges” that transfer cold up into the room. Instead, apply wood glue to the tongue and groove joints and slot them together. This creates a solid, heavy “floating” floor that rests securely on the foam. Leave a 10mm expansion gap between the wood and the shed walls.
5. Check the door
Standard shed doors open outwards, meaning this new thicker floor will simply create a small step up into the room. However, if your shed door opens inwards, or if the new floor height sits above the door threshold, you may need to mark and trim the bottom of the door so it clears the new floor.
6. Finish edges
Fit skirting boards or wooden trims around the perimeter of the room. This covers your 10mm expansion gap, stops the floating floor from shifting, and gives the room a neat, professional finish.
That’s it! Adapt measurements and cuts as needed, and keep a level nearby to check the floor as you go.
How to Insulate a Floor from Underneath (for Sheds on Bearers)
You can only do this if there’s enough space under your shed to move around safely. Otherwise, follow the false floor steps instead.
1. Check the shed’s underside
Crawl or kneel under the shed and look at the floor joists. Make sure there’s enough clearance to work and that the joists are solid, and any wiring or pipes are out of the way.
2. Install the insulation
Cut rigid foam boards or mineral wool (in breathable bags) to fit between the joists. Push them in so they sit flat and leave no gaps. This will keep the floor warmer and reduce heat loss.
3. Optional protective layer
If the insulation might be exposed to damage, fix a thin sheet of plywood or a breathable board underneath. This keeps pests and moisture at bay while still letting the insulation do its job.
Key Takeaways
- There will be a slight loss of internal height if you’ve built a false floor. Though this can only mean a few centimetres. Still, you can work this out by trimming the door clearance if needed.
- On a good note, the floor is warmer and drier, which also helps protect stored items from damp.
- Warranty reminder: These modifications could void the shed’s guarantee. Carry out these changes at your own risk.
Read next for more on shed insulation: Do You Need An Air Gap For Shed Insulation


