Jump to:
Insulating a summer house is the key to making it a comfortable haven, no matter the season. It regulates the temperature inside and reduces energy consumption. But how do you do it?
This guide will break down the steps on how to insulate a summer house, focusing on the walls, roof, and flooring. Depending on your skills and resources, the process can be straightforward. Let’s get into it!
What’s the Best Way to Insulate a Summer House Wall?
Here’s a quick breakdown to help you compare the options:
| Material | Best For | Key Benefit |
|---|---|---|
| Fibreglass Batts | DIY on a budget | Affordable and very easy to handle/install. |
| Rigid Foam Boards | Maximum warmth | High thermal resistance; great for thin walls. |
| Blown-in Insulation | Older or awkward sheds | Fills gaps and hard-to-reach cavities perfectly. |
The best way to do so involves adding insulating materials between the wall studs. Fibreglass batts or rigid foam insulation boards are commonly used for this purpose.
Fibreglass batts consist of tiny glass fibres, and they’re affordable and easy to install. Rigid foams, often made from polystyrene, have excellent thermal resistance.
Another effective method is blown-in insulation. As the name suggests, the loose insulation material is blown into the wall cavities. This approach ensures even coverage and is particularly useful for filling hard-to-reach spaces.
How to insulate a summer house wall?

(Image Credit: Wikimedia Commons)
- Gather materials: Collect the necessary insulation materials based on your preference and budget. For instance, if using fibreglass batts, ensure you have enough batts to cover the wall area. If opting for rigid foam insulation boards, purchase the appropriate-sized boards.
- Prepare workspace: Clear the area around the wall where you’ll be working. Remove any obstacles or debris that could hinder the insulation process.
- Measure and cut: Accurately measure the space between wall studs and cut materials to fit. For fibreglass batts, use a utility knife to trim them to the right size. For rigid foam insulation boards, a saw may be needed.
- Install insulation: Place the insulation material between the wall studs. For fibreglass batts, simply insert them and press gently to secure them. For rigid foam insulation boards, use adhesive or fasteners to attach them to the wall.
- Seal gaps: Inspect the installed insulation for any gaps or openings. Seal these gaps using additional insulation material or sealant to maximise energy efficiency.
- Blown-in insulation: This step is optional. It’s best to hire a professional to blow the material into the wall cavities evenly. They have the expertise and equipment to reach difficult areas and prevent overfilling. This reduces the risk of energy loss and ensures the insulation performs effectively. Most importantly, this saves time and money in the long run.
- Clean up: After insulation, dispose of extra materials to maintain safety and cleanliness. Clearing debris prevents hazards and ensures a tidy space. It also helps in assessing the insulation’s effectiveness.
Is DIY insulation the right move?
It often looks straightforward at first, but once you factor in sourcing materials, precision cutting, and getting the finish right, it ends up taking more time and effort. Some parts may also need specialist tools or experience.
Take all this work off your plate with an insulated summer house, especially if you’re after a simpler setup. Because the insulation is fitted during the build, there’s no need to retrofit it afterwards or worry about gaps forming.
Are Metal Sheds Noisy When It Rains?
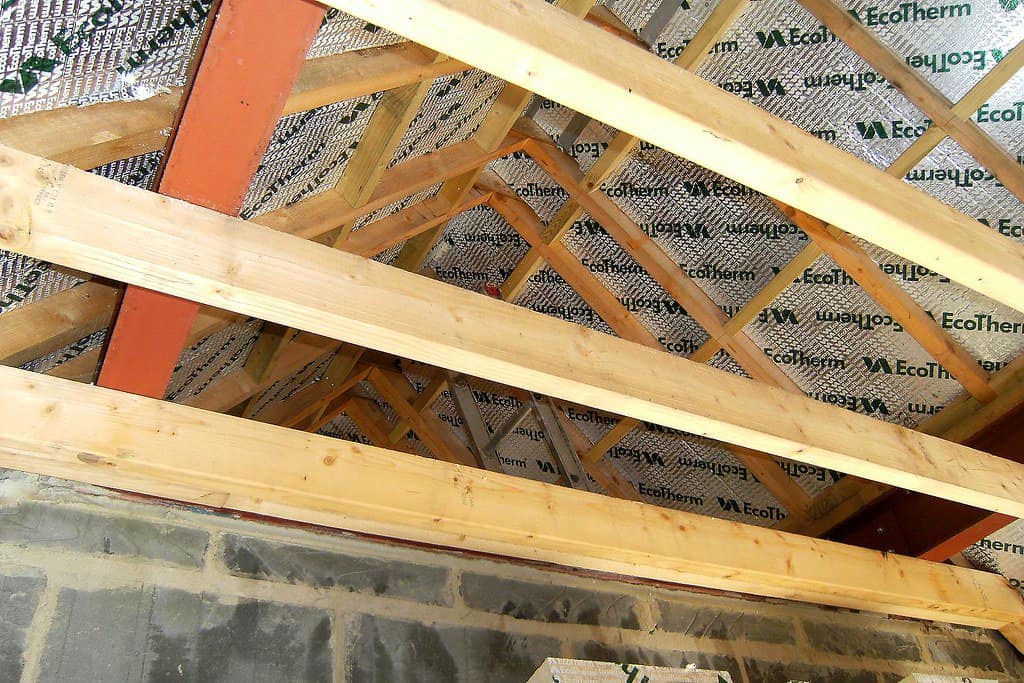
Why Should You Insulate the Roof?
Insulating the roof regulates indoor temperatures, keeping it cool in summer and warm in winter. This can be done by installing insulation between rafters or over the existing roof.
Materials like fibreglass batts, spray foam, or rigid foam boards are commonly used. Reflective barriers further minimise heat transfer. Efficient roof insulation ensures comfortable living conditions and reduces energy costs year-round.
How to insulate a summer house roof?
- Select insulation material: Choose the right insulation material for your summer house roof.
- Prepare roof surface: Ensure the roof surface is clean and free of debris. Repair any damage or leaks before proceeding.
- Measure roof space: Measure the area of your roof. This will help you determine how much insulation material you’ll need.
- Cut insulation to fit: Cut the insulation material to fit the dimensions of your roof. You may use a utility knife for fibreglass batts or a saw for rigid foam boards.
- Install insulation: Place the insulation material evenly across the roof surface. Ensure complete coverage.
- Secure insulation: Use appropriate fasteners or adhesive to secure the insulation. This will keep the material in place and prevent shifting.
- Consider reflective barriers: Reflective barriers can further enhance insulation by reducing heat transfer. Consider adding them for extra efficiency.
- Inspect and clean up: Inspect the roof for any gaps or areas needing extra insulation. Dispose of any excess material and clean the workspace thoroughly.
Why Does Floor Insulation Matter in Summer Houses?
It helps maintain a comfortable indoor temperature year-round. It’s highly recommended if you have raised or suspended floor setups. Materials like foam boards or fibreglass batts work well. Sealing gaps and adding a vapour barrier enhances insulation and prevents moisture problems.
How to insulate a summer house flooring?
- Assess flooring structure: Look at your summer house floor to see if it’s raised or suspended. This helps you choose the right insulation method.
- Choose insulation material: Consider your budget, needs, and local climate. Both options are effective and affordable options for different floor structures.
- Cut insulation to size: Measure the space between floor joists accurately. Then, cut the insulation material to fit using the appropriate tools. This ensures a snug fit and maximum effectiveness.
- Place insulation: Fit the cut insulation snugly between floor joists for optimal performance. This should provide a continuous barrier against temperature changes.
- Seal gaps and cracks: Prevent heat loss and moisture leaks with a sealant or insulation foam. This maintains the integrity of the insulation and improves its effectiveness.
- Consider vapour barrier: This is optional. This additional layer prevents condensation buildup. Plus, it further safeguards the insulation from moisture-related damage.
- Secure insulation: Consider this if needed. It prevents insulation displacement over time by securing it with fasteners or adhesives. This ensures long-term effectiveness and maintains consistent temperature regulation in the summer house.
- Inspect and tidy up: After installation, check for missed areas or gaps in insulation. Dispose of excess materials and tidy the workspace to ensure safety and a neat finish. This final step ensures the insulation works efficiently and the area remains clean.
There you have it! You can now enjoy a peaceful summer retreat not only during summer but also in winter. We trust this guide has provided helpful insights for insulating your summer house.
Next on your reading list: How to Clean Your Summer House Ready for Summer
FAQ
Does insulation help with summer heat?
Yes! Insulation works both ways. While we often think of it for winter warmth, it also slows down the heat coming in from outside. In summer, this means the sun’s heat takes longer to build up inside the summer house, so the space doesn’t warm up as quickly during the day.
It won’t stop the heat completely, but it can reduce how hot the shed gets during warmer months like July and August.
How much does it cost to insulate a summer house DIY?
The cost depends on the size of the space and the materials used. For a small summer house (around 7×7), DIY insulation materials such as fibreglass or rigid foam boards cost between £200 and £500.
Wider estimates are often higher overall, depending on coverage and material choice, and can go beyond this range for larger or fully lined builds. When you add up labour, tools, and fitting time, a pre-insulated model can often come out as the more practical option.
Can I insulate a summer house that’s already built?
Yes, you can. This is called retrofitting. While it’s easiest to insulate the floor during the initial build, walls and roofs can be insulated at any time. Just be sure to check for any dampness or leaks before you cover the wooden structure with insulation.
Note: Check your warranty. Some manufacturers may not cover changes made after installation, especially if it involves fixing insulation to the internal structure.
Do I need planning permission to insulate my summer house?
No. Internal insulation doesn’t change the size or footprint of your building, so it still falls under “permitted development.” Summerhouse planning permission isn’t necessary.
However, if your insulation makes the building taller or if you live in a conservation area, check with your local council.


