Jump to:
Setting up your shed is one thing, but anchoring it is another. Strong winds can lift or move metal or plastic sheds if not bolted down to the earth or foundation. This guide will show you how to anchor a shed on a concrete base.
How to Anchor a Metal Shed
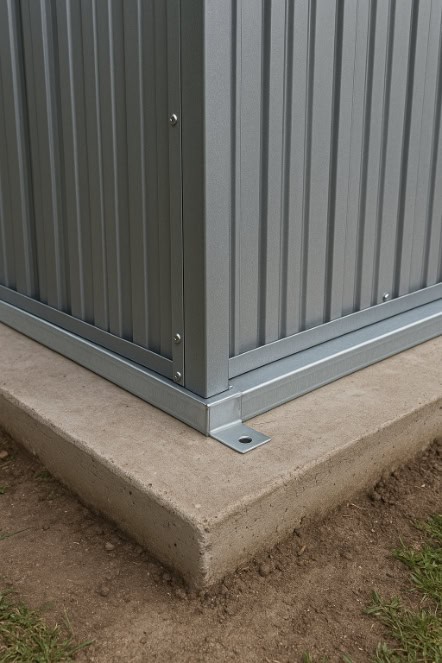
Unfortunately, a metal shed base alone won’t guarantee its stability from heavy gusts. Follow these general steps below, but feel free to adjust them as needed to fit your shed and slab:
- Mark the base to lay out where the shed will sit on the surface and ensure the frame lines up with it.
- Place the foundation kit frame on the slab. Align all corners so the frame sits flat.
- Drill the holes to match the holes in the frame. If you have a concrete base, you will need to use a hammer drill and a masonry bit. Take your time to get the positions right; a misplaced hole can make tightening the bolts tricky.
- Insert the anchor bolts by pushing them through the frame into the drilled holes.
- Tighten the bolts with a wrench; this is what stops the shed from shifting over time.
- Fit the floor panels once the frame is anchored.
The shed is now level, stable, and ready to handle everyday use without movement.
Tip: If needed, apply an all-weather sealant on the frame before tightening the bolts. Doing so will add extra grip as well as keep water at bay underneath.
Sorting the base is half the job; pair it with the right shed, and you’re set. Have a look at our options below. They’re quick to assemble, and some come with foundation kits.
How to Anchor a Plastic Shed
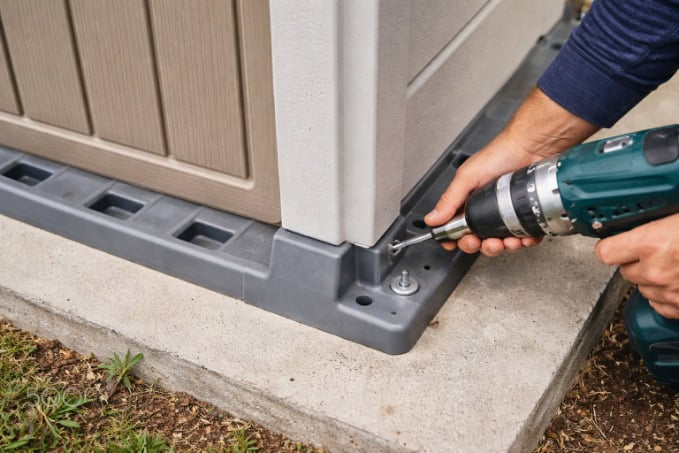
A plastic shed tends to be lighter than metal, which makes these steps more crucial. Use these steps to get it done:
- Position the shed where it will sit on the concrete, aligned and levelled. This applies if the structure is newly set up. If yours has been sitting in your garden for a while now, move it to the slab.
- Mark the drilling points using the shed’s frame holes to avoid mistakes and keep the shed square.
- Use a hammer drill with a masonry bit to create holes in the plastic shed base where the bolts will be installed.
- Place the anchor bolts into the holes and turn them until the frame is firm. The shed should remain in place with no wobble or movement.
- Lay the shed’s floor on top. With the frame fixed, the floor stays flat, and the shed is ready for use.
Add small rubber pads under the frame to prevent direct contact with the slab. Or, fit corner braces or extra brackets for extra stability.
Plastic sheds are lighter and easier to handle. If that sounds like what you need:
Common Mistakes to Avoid When Anchoring a Shed
Even a few small mistakes can make your shed wobbly or unstable. Watch out for these:
Skipping the drilling
You might be tempted to just bolt the shed on top, but the bolts need to go into the concrete. Skip that, and the shed can move, tilt, or even lift if someone leans on it.
Relying on the shed’s weight
Just letting the shed sit on the slab isn’t enough, especially for lighter metal or plastic ones. Even a small gust or a bit of pressure can make it move, otherwise.
Leaving gaps between the shed and slab
A small gap might seem harmless, but it can let the frame twist or the floor panels bend. Make sure the shed sits flush so the bolts can do their job.
Over-tightening bolts
On the flip side, don’t crank the bolts too hard. That can crack the frame or strip the threads. Tighten them until the shed feels firm, but stop before forcing it.
Not checking after installation
Things can settle or shift a little in the first few weeks. Take a walk around, check the bolts, and give them a quick retightening if needed.
Don’t make mistakes when investing in or upgrading your shed either! Refer to our buying guide below to get everything you need to know before you choose:
Round-up
Anchoring your metal or plastic shed doesn’t have to be complicated, but it’s worth doing right. Taking the time to mark the base, drill into the concrete, and tighten the bolts. Plastic sheds need a bit more care since they’re lighter.
Follow the steps, double-check your bolts, and you’ll have a shed that stays put for years!
Browse more shed options here:


