If you’re ready to roll up your sleeves, we’ll walk you through how to build a shed made from wood. This is a general guide, so feel free to use it as a reference and make adjustments as needed.
Right, here we go!
The Parts You Need to Build a Shed
If you’re doing this truly from scratch, that means acquiring your own materials and cutting them to size. Some parts could be pre-assembled. Depending on the shed plan you’re working from, here are the typical parts you would need:
- Floor bearers
- Floorboards
- Joists
- Sill plates
- Wall studs
- Wall panels
- Headers
- Rafters
- Trusses
- Roof boards
- Roofing felt or shingles
- Windows (frames and glazing)
- Door (hinges and lock)
Of course, a prefabricated wooden shed would be much easier to work with, rather than acquiring the materials to make all these parts. Factory manufacturing conditions also ensure uniform consistency of measurements for the parts.
If you don’t have large-scale machine cutting available to you, prefab is the way to go.
Skip the hardware store scavenger hunt. Our wooden shed kits come with pre-cut panels and all the fixings you need to move straight to assembly.
Wooden Shed Building Instructions
Check your local council guidelines before you start. Most garden sheds fall under permitted development, but restrictions can apply around height, placement, and how close it is to boundaries. Rules can be stricter in conservation areas or for listed properties.
Learn more about planning permission for sheds.
Step 1: Prepare the area
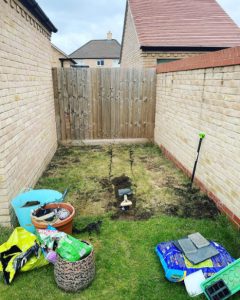
This is where your wooden shed will be built.
- Mark out the corners using the measurements and stakes
- Run a string between the stakes to outline the perimeter
A tape measure can help if you want more accurate spacing.
Step 2: Build the foundation
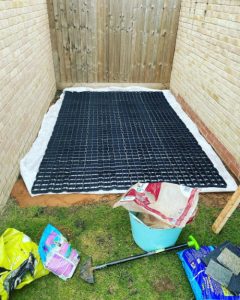
A solid foundation is essential for stability and long-term durability. Concrete piles are straightforward to set up, so we’ll use those here.
This guide is based on a 2x2m shed base. Adjust measurements if your shed is a different size.
- Mark out nine foundation points in a 3×3 grid, spaced 1m apart. Each point should be 40x40cm. Dig holes to about 35 to 40cm deep (go deeper if the ground is soft or unstable). In sandy soil, use timber formwork to keep the edges square.
- Cut three floor joists to 1.9m from 50x150mm timber. Position them over the layout and secure with ground anchors centred in each hole. Use temporary blocks to hold the joists.
- Pour concrete into each hole, stopping just below the bottom of the joists. Leave the blocks while the concrete sets.
- Once the concrete has cured, install the outer crossbeams at 2m, then fit the centre supports at 92.5cm.
- Add a layer of coarse gravel or crushed stone into each square to help with drainage and stabilise the foundation.
Step 3: Install flooring
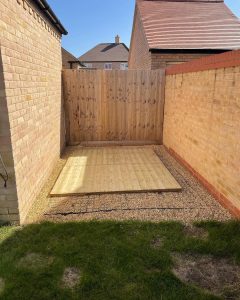
- Lay the first board across the three joists with the tongue facing into the shed, then screw it down.
- Slot the next board’s groove onto the first one’s tongue, secure it, and carry on until the floor is fully covered.
- Trim any excess from the tongue of the last board once finished.
Step 4: Assemble and install the shed walls
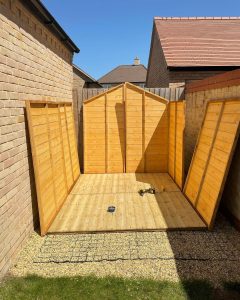
- Lay out the bottom and top plates for each wall section. If it’s a bit much to handle on your own, get a friend to give you a hand.
- Fix the vertical studs between the plates at even intervals. Add headers above any door or window openings.
- Lift each wall section into place on the shed base and secure it with screws.
Make sure your wall panels already have cut-outs for doors and windows before fitting them.
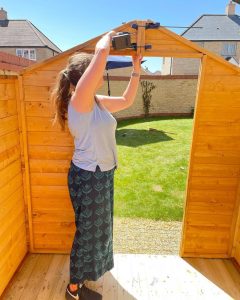
Step 5: Mount doors and windows
- Fit each door and window frame into its opening, based on your shed layout, and nail them.
- Adjust the hinges until they open and close how you want them to.
Tip: Apply silicone sealant around the edges for shed insulation and a shed lock for security.
Step 6: Work on the roof beams
- Cut five rafters from 150x150mm timber, each to 2430mm. Cut one end at 30° and the other at 60°.
- Cut notches so the rafters sit neatly on the wall frame. These should line up with the vertical posts, around 20 to 28cm in from each end. Each notch should be about 76mm long and 15mm deep.
- Fasten the rafters in place using 6x150mm screws.
Not keen on working out rafter angles? An apex roof shed skips the complicated cuts and gives you more headroom. Find yours here:
Step 7: Mount the roof battens and panel
These parts support the roof covering.
- Cut eight battens to 438mm from the same timber and fix them between the rafters, running across them.
- Keep the top of each batten level with the tops of the rafters so you get a flat, even surface.
- Once fitted, lay the OSB roof panel over the top to create a solid base for the roof covering.
Step 8: Install the roof covering
When building a shed roof, you’ve got a few good options for the covering, including shed roof tiles, green mineral felt, or metal panels.
Going with shingles? Start at the bottom edge of the roof and work your way up, overlapping each row as you go. With felt, roll it out over the OSB board for that extra waterproof layer and fasten. For metal panels, line them up with the roof edge and screw them down.
Once fitted, seal all edges and corners with roofing adhesive or sealant to help keep water out.
And if you’re building against a fence or under low-hanging trees, a pent (single-slope) roof is the most efficient choice for water runoff and height restrictions.
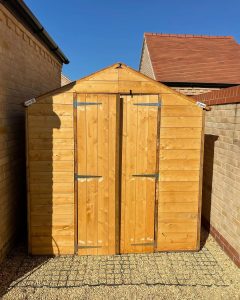
Step 9: Clad the exterior
After you’ve fitted the roof covering:
- Install the tongue and groove panelling for a neat finish and added weather protection.
- Fit the panels vertically to help water run off and reduce moisture build-up between boards.
- Fix each panel to the frame using screws or nails, working your way around the shed.
Step 10: Finishing touches
Nine steps later, your DIY shed is up and almost finish. If you use it mainly for storage, add a few shelving units to maximise the space. Hooks are also perfect for hanging long items like your rake or broom.
Pop in some indoor lighting to make it accessible at night. For the windows, add a bit of flair with curtains for privacy and blocking intense sunlight.
Painting the timber panels is also a good idea for a quick makeover. If the shed is made from pressure-treated timber, you’ll have to wait for the treatment to cure. You can read more here: Painting Pressure Treated Wood – How to Do it Right
Round-up
How to build a shed can vary depending on your requirements, but these steps can help you lay the groundwork. Keep in mind that you have to source all the materials and do the woodwork your own.
If you want to give our kits a try, you’ll have the walls pre-assembled, saving you extra time and effort. For options, here’s our BillyOh selection of the best small sheds.
FAQ
Do I need a concrete base for every shed?
Not necessarily. While a concrete slab is the gold standard, small sheds can be built on a timber pressure-treated base or a levelled gravel foundation. Either way, the surface must be perfectly level. If it’s off by even a few millimetres, the door frames will eventually warp and stick.
How long does it take to build a wooden shed from scratch?
Expect to spend a full weekend (2 to 3 days) for a solo DIYer building from raw materials. That covers time for measuring, cutting, and waiting for the concrete to cure. Using a prefabricated kit usually cuts this down to a single afternoon (about 4 to 8 hours), since the main parts are already cut and ready to assemble.
Should I paint or stain my shed immediately?
It depends on the wood type. If the timber is untreated, you should apply a preservative or stain as soon as the build is finished to prevent moisture damage. However, if you are using pressure-treated (tanalised) timber, wait for 2 to 4 months. The treatment needs time to breathe and dry out completely.
How do I prevent my shed from rotting at the bottom?
Make sure your floor bearers are pressure-treated and that the shed sits a few inches off the ground so it’s not in direct contact with damp soil. This also allows air to circulate underneath, which helps keep the timber dry.
While you’re at it, clear away grass, weeds, or debris around the base so moisture doesn’t sit against the wood for long periods.